Tutorial
Using Nano Banana: Step by Step
Nano Banana (Gemini 2.5 Flash Image) is Google DeepMind’s advanced AI model for image editing and generation. Unlike traditional “text-to-image” generators, its main focus is editing existing images with natural language instructions. That means you can take your own photo (or any picture), describe what you want changed, and Nano Banana will modify the image — while keeping the rest intact.
It has become especially known for:
- Consistency: Characters, faces, and objects stay recognizable across edits.
- Precision: You can make small, localized changes without the entire image shifting.
- Creativity: It can blend multiple images, swap backgrounds, or apply stylistic transformations.
- Accessibility: Because you don’t need advanced editing skills — plain text instructions are enough.
This makes Nano Banana both a creative tool for designers / artists and a practical tool for casual users who just want to tweak a picture without learning Photoshop-level skills.
Key Features & Capabilities
Here are the standout features, explained simply:
- Natural language editing
- Type what you want changed, and it edits accordingly (e.g. “make the sky stormy,” “remove the person on the right”).
- Subject / character consistency
- Maintains identity of people, pets, or objects across edits. Faces and proportions remain stable.
- Scene preservation
- Only modifies what you ask for — background, lighting, and perspective stay coherent.
- Pixel-level / localized edits
- You can target very small changes (change shirt color, fix hair, remove a lamp) without disturbing the whole image.
- Multi-image blending
- Upload two or more images and combine them into one (e.g. put a person from Image A into the setting of Image B).
- One-shot editing efficiency
- Often gets the edit right on the first attempt, with less back-and-forth prompting.
- Batch processing
- Apply the same edit across multiple images for consistent results (useful for branding or content series).
- Stylization & transfer
- Apply artistic styles, moods, or textures from one image onto another.
- Integration with tools
- Works inside the Gemini app, Google AI Studio, and some creative apps (e.g. Photoshop plugin beta).
- Provenance watermarking
- Uses invisible “SynthID” watermarking to mark AI-generated edits responsibly.
- Limits / caveats
- Cropping and very extreme edits can sometimes be unreliable.
- Ambiguous prompts may confuse the model or cause it to “revert” to original imagery.
How to Use Nano Banana (Step by Step)
Step 1: Open the tool
- In the Gemini app (mobile or web), go to the image editing section.
- Or in Google AI Studio, select Gemini 2.5 Flash Image.
- Some apps (like Photoshop beta) let you use Nano Banana inside their interface.


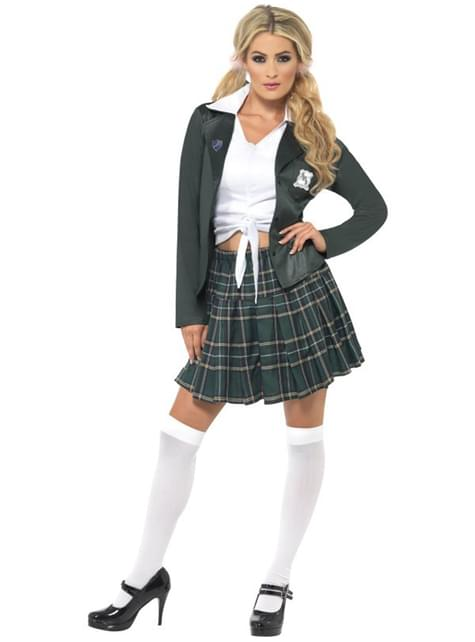
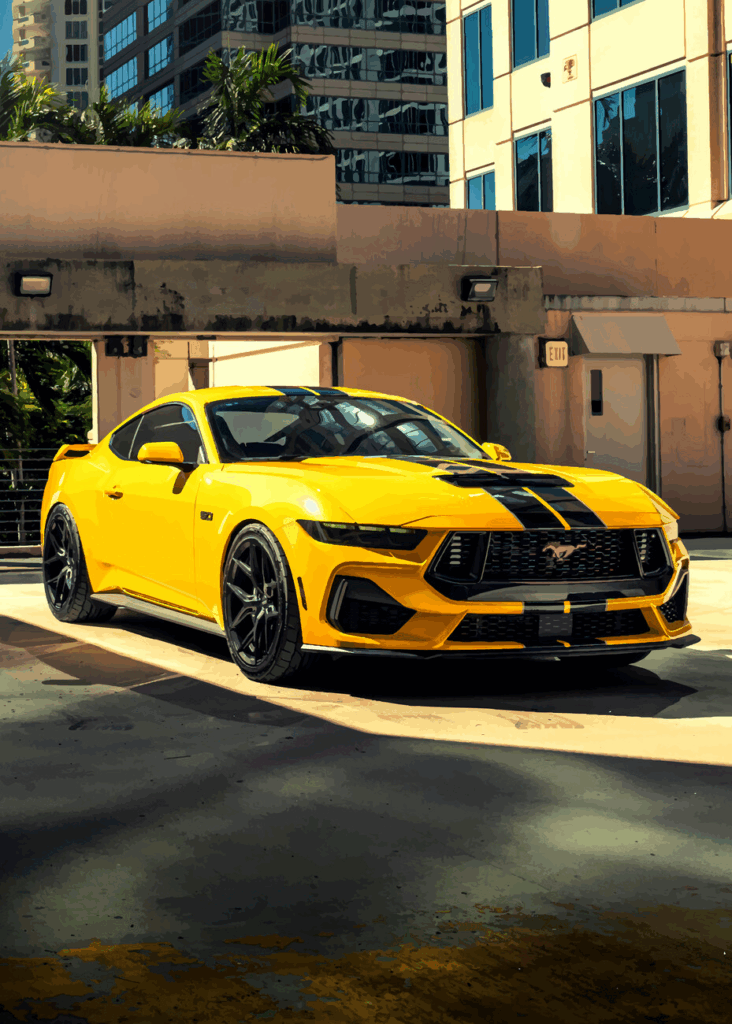
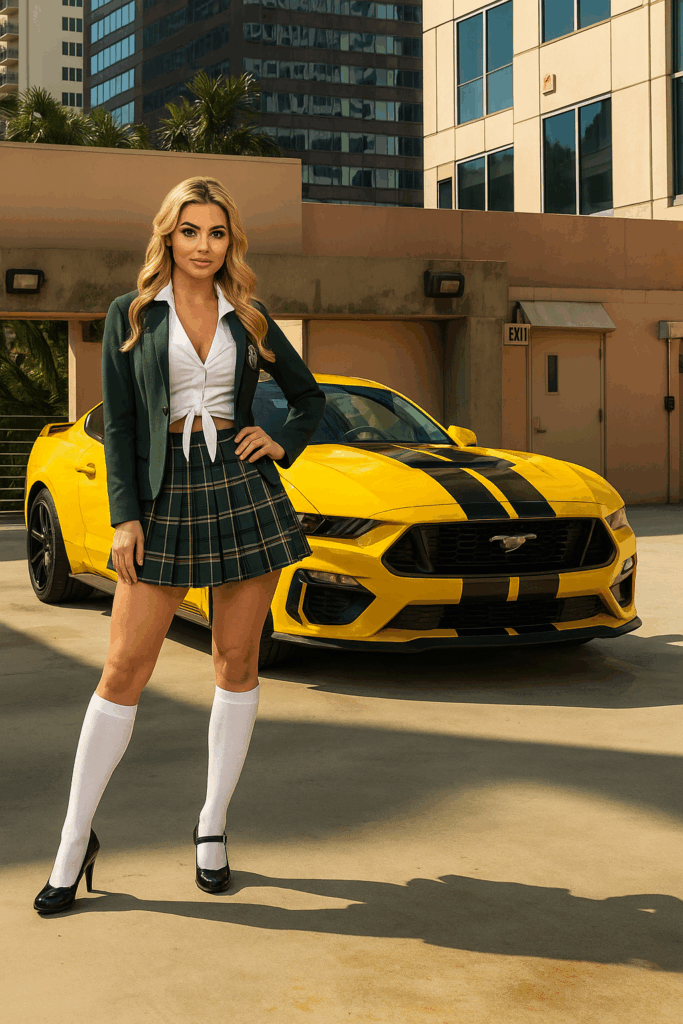
Let’s upload two images: A girl and a car.


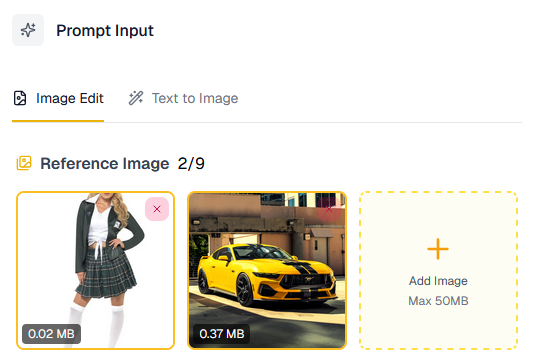
Step 2: Upload your base image(s)
- For single edits, upload one photo.
- For blending/fusion, upload 2–3 reference images (e.g. “use this background with this person”).

Step 3: Write your prompt
Be clear and descriptive. Mention what to change, what to keep, and what style you want.
- Example: “The girl will stand in front of the car, pretending it’s hers, and pose for a photo.”

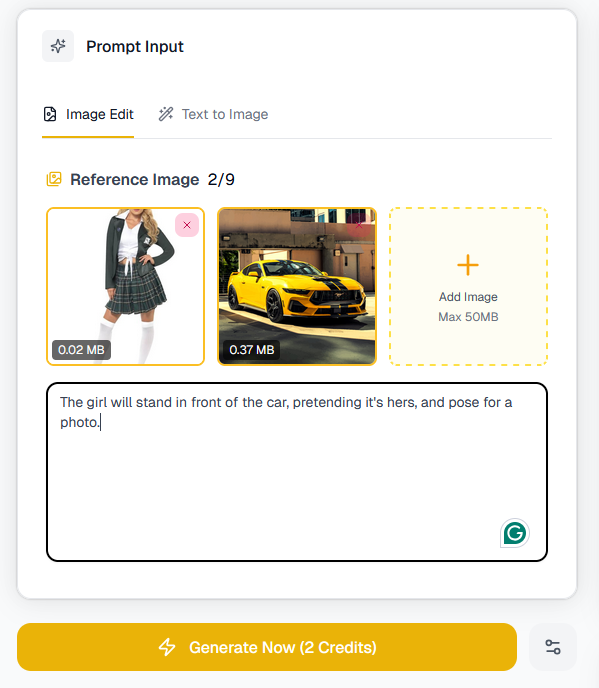
Step 4: Generate
Click Generate/Edit. The model will produce 1–4 variations, depending on the platform.
You will get an image like this.

Step 5: Refine if needed
You can add follow-up prompts like:
- “Make the sky more dramatic with purple tones.”
- “Fix the hand so it looks more natural.”
- “Add soft shadows under the added objects.”
Step 6: Save or batch apply
- Export your favorite version.
- Or apply the same edit to multiple photos (batch mode).
Example Prompts
Here’s a range of examples — from simple fixes to creative experiments.
🔹 Basic Fixes
- “Remove the person in the background.”
- “Brighten the photo, adjust lighting to golden hour.”
- “Change the red shirt to a navy blue sweater.”
🔹 Creative Background Swaps
- “Put me in a snowy mountain scene, with warm winter lighting.”
- “Replace the background with a Japanese cherry blossom park.”
- “Make the photo look like it was taken inside a sci-fi spaceship.”
🔹 Style & Mood
- “Turn this portrait into a watercolor painting.”
- “Make it look cinematic, with dramatic shadows.”
- “Apply an 80s retro aesthetic with neon colors.”
🔹 Multi-Image Fusion
- “Take the dog from Image A and place it in the garden from Image B.”
- “Blend the city skyline from this photo with the night sky from the other one.”
- “Use the outfit from Image A on the person in Image B.”
🔹 Fun Transformations
- “Turn this person into a Pixar-style 3D character.”
- “Make it look like a clay stop-motion figurine.”
- “Add a futuristic hologram effect over the laptop screen.”
Tips & Tricks (Pro User Guide)
Here are practical tricks for getting the best results:
- Be specific
- Instead of: “Make it better” → Say: “Sharpen the face, soften the background blur, adjust lighting to warm tones.”
- Lock the identity
- Add instructions like: “Keep the person’s face exactly the same” or “Do not change hairstyle or expression.”
- Iterate in steps
- Complex edits work best when broken into smaller instructions. Example:
- First: “Change background to Paris street at night.”
- Then: “Add glowing street lamps.”
- Finally: “Put an umbrella in their hand.”
- Complex edits work best when broken into smaller instructions. Example:
- Use style cues
- Add phrases like “in cinematic style,” “as an oil painting,” “soft pastel tones” to control aesthetics.
- Fix mistakes with direct instructions
- If hands, eyes, or details glitch, try: “Fix the right hand so it has 5 fingers, natural skin texture.”
- Work with references
- When blending, always upload reference images so the model knows exactly what you mean.
- Batch smartly
- If editing 20 photos for social media, define your look once, then apply to all in batch.
- Test small before full
- Run a crop of your photo to refine the prompt before applying edits to the full-resolution image.
- Negative prompts
- You can often say: “Don’t change the hair” or “Leave the sky untouched” to lock areas.
- Post-check for artifacts
- Zoom in — if edges look off, ask: “Blend edges more softly” or “Fix lighting consistency.”
Limitations
- Cropping can be unreliable — it sometimes refuses or glitches.
- Extreme changes (e.g. “turn day into midnight during a snowstorm in space”) may produce artifacts.
- Ambiguous prompts can confuse the model. Always clarify.
- Fine details (hands, jewelry, text) sometimes require manual cleanup.
Why Use Nano Banana?
Use it when you want to:
- Quickly edit photos without Photoshop skills.
- Maintain consistency across a set of images (great for creators and brands).
- Experiment with background swaps and stylizations.
- Prototype ideas, concepts, or designs visually in seconds.
Nano Banana is best thought of as a natural-language photo editor with creative superpowers. It won’t replace a professional retoucher entirely, but it massively lowers the barrier for making polished, creative, and consistent edits.